AI art generation has been exploding in the last year, and the once difficult to manage tools are now incredibly easy to use, modular, and versatile. Last year I created a Discord bot that generated AI art from my own privately hosted DALL‑E 2 public model. This was quite cumbersome to setup, and it wasn’t very flexible if I wanted to make small changes. After exploring what’s changed in the last year, I can confidently say that all of my pain points have been resolved by the latest iteration of art generation: Stable Diffusion. In this post, I wanted to share how easy it truly is to create your own AI art generating Slack bot. I chose Slack this time, because at MichiganLabs we use Slack as our communication tool, so it’s a little more relevant to our own work. But there is a lot of overlap between Slack and Discord, if you’re using their respective Typescript libraries. With that said, start your timer, because this should only take about 10 minutes (as long as your internet speed is fast enough!).
Requirements #
You just need a computer with a 4GB+ GPU.
You can use Linux or Apple Silicon, but it’s a bit easier (with respect to NVIDIA drivers) with Windows. For my setup, I like modularity and low-profile hardware. I use the following:
- Intel NUC 8 — One of the few mini PCs that has Thunderbolt support
- Razer Core X — This is an excellent plug-and-play enclosure that uses Thunderbolt
- RTX 3080 — This generates about one image per second, which has been plenty fast for my needs
Getting Started #
Next, you’ll need to install a couple dependencies and activate a new Slack application.
The Stable Diffusion Web UI
This stable diffusion web UI project gives us more than what we’re trying to accomplish, but that’s a good thing! It’s highly extensible, with tons of options for adding more models and customizations. It can also provide a really great web frontend to interact with your hosted model. For our Slack bot purposes however, follow these steps to get it ready for a different interface:
Install all of the dependencies from the Web UI readme (the git repo, Python 3.10+, and the Stable Diffusion 4GB model)
Go into the
stable-diffusion-webuirepo and openwebui-user.bat, and change theCOMMANDLINE_ARGSso that your file looks like this:@echo off set PYTHON= set GIT= set VENV_DIR= set COMMANDLINE_ARGS=--api --nowebui --listen call webui.bat--apitells the web UI to generate a swagger doc at the server’s<IP>/docwebsite path. This is optional, but helpful when you’re trying to learn about what your new api can do--nowebuimakes it start a bit faster by skipping the frontend. This is optional--listentells the api server to run on the local network, instead of the local host. This is required for our Slack bot to be able to access it
Run
webui-user.batand the server should start up in a command prompt window
To verify that it’s running properly, try going to <IP_ADDRESS>:7861/docs in a browser. You should see a Swagger UI page.
The Slack Bot
Next, we’ll create a very simple Slack application using Typescript. This bot will be invoked in a Slack channel by typing /art <PROMPT>, and the bot will reply with the result from our Stable Diffusion model.
Make sure you have Node.js installed
Clone my bare-bones Typescript Slack bot template to follow along quicker
git clone https://github.com/DaveAldon/AI-Art-Slack-BotInside this repo, install the dependencies with a quick
npm install. Then create an.envfile that matches the.env.examplefile. For theBACKEND_URLfield, add your Stable Diffusion server’s IP address and port like this:http://<IP>:7861. The API runs on port 7861 by defaultGo to the Slack application dashboard, and create a new app from an app manifest. This will make configuration easier
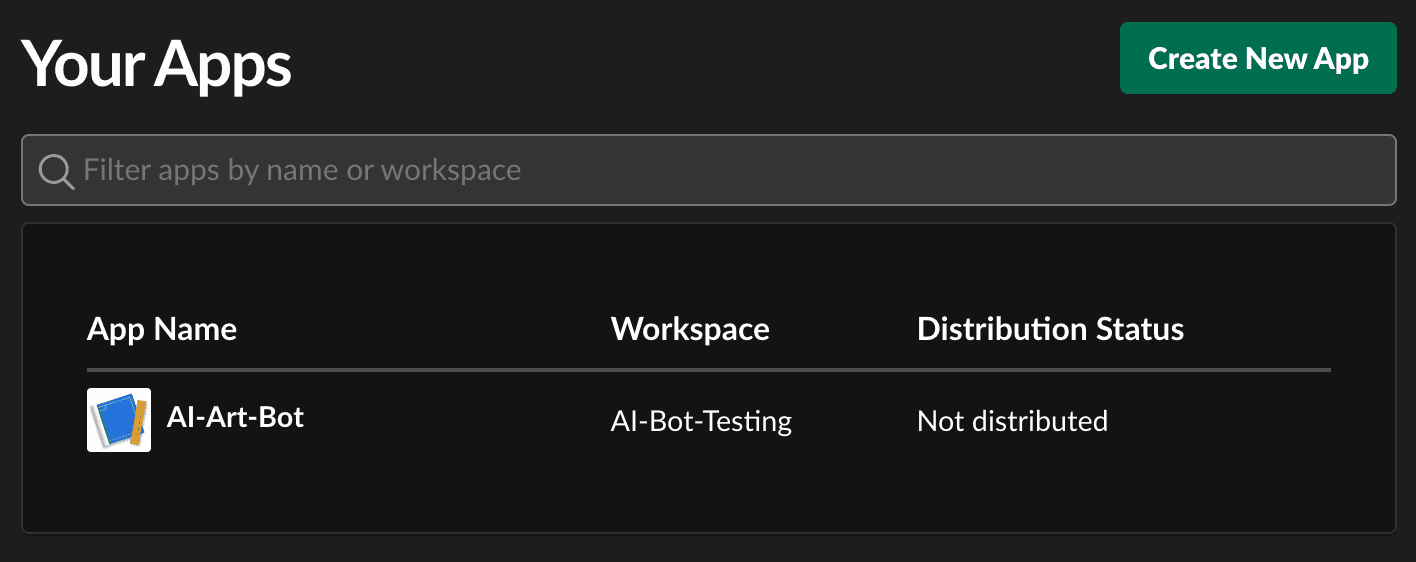
You can use the manifest I used for this basic example below:
 display_information:
   name: AI-Art-Bot
 features:
   bot_user:
     display_name: AI Art Bot
     always_online: false
   slash_commands:
     - command: /art
       description: Get AI generated art from your prompt
       should_escape: false
 oauth_config:
   scopes:
     bot:
       - commands
       - users:read
       - files:write
 settings:
   interactivity:
     is_enabled: true
   org_deploy_enabled: false
   socket_mode_enabled: true
   token_rotation_enabled: false
We need the
files:writepermission, which can be different from ordinary Slack bots, because of how we’ll upload our photos into the channel.Install to a workspace
Press the
Install App to Workspacebutton, and authorize the bot to be installed in your workspace.Retrieve the needed tokens
Go to App-Level Tokens in your bot’s settings page, and add a new one with whatever name you want, and the
connection:writescope. This will be used to send messages to the channel. Place this token in your.envfile asSLACK_APP_TOKEN.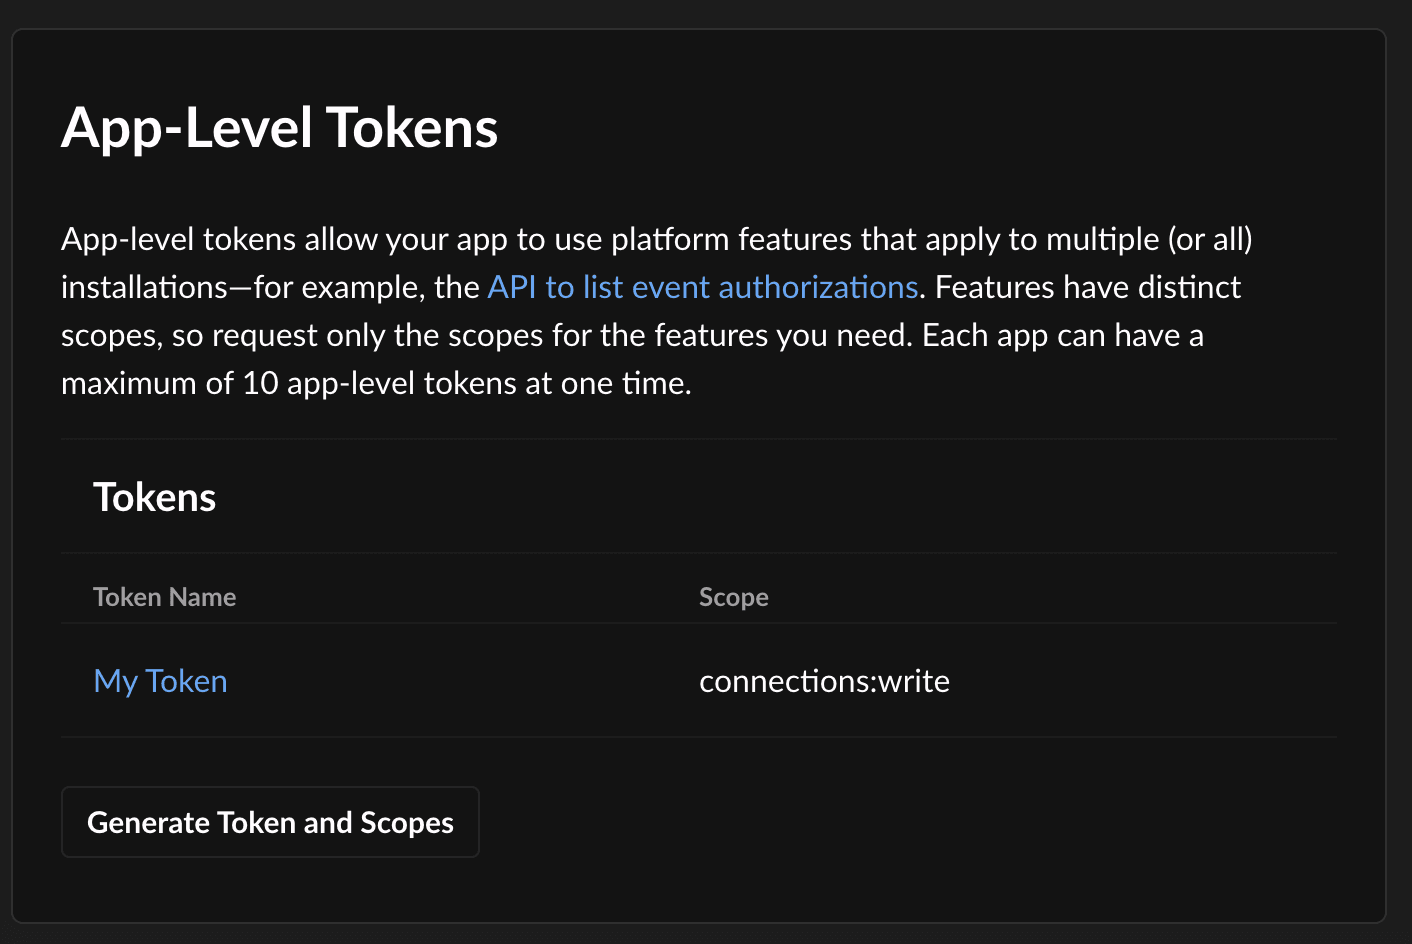
Lastly, we need to generate an OAuth token. Go to
Install Appand copy theBot User OAuth Token. Put this in your.envfile asSLACK_BOT_TOKEN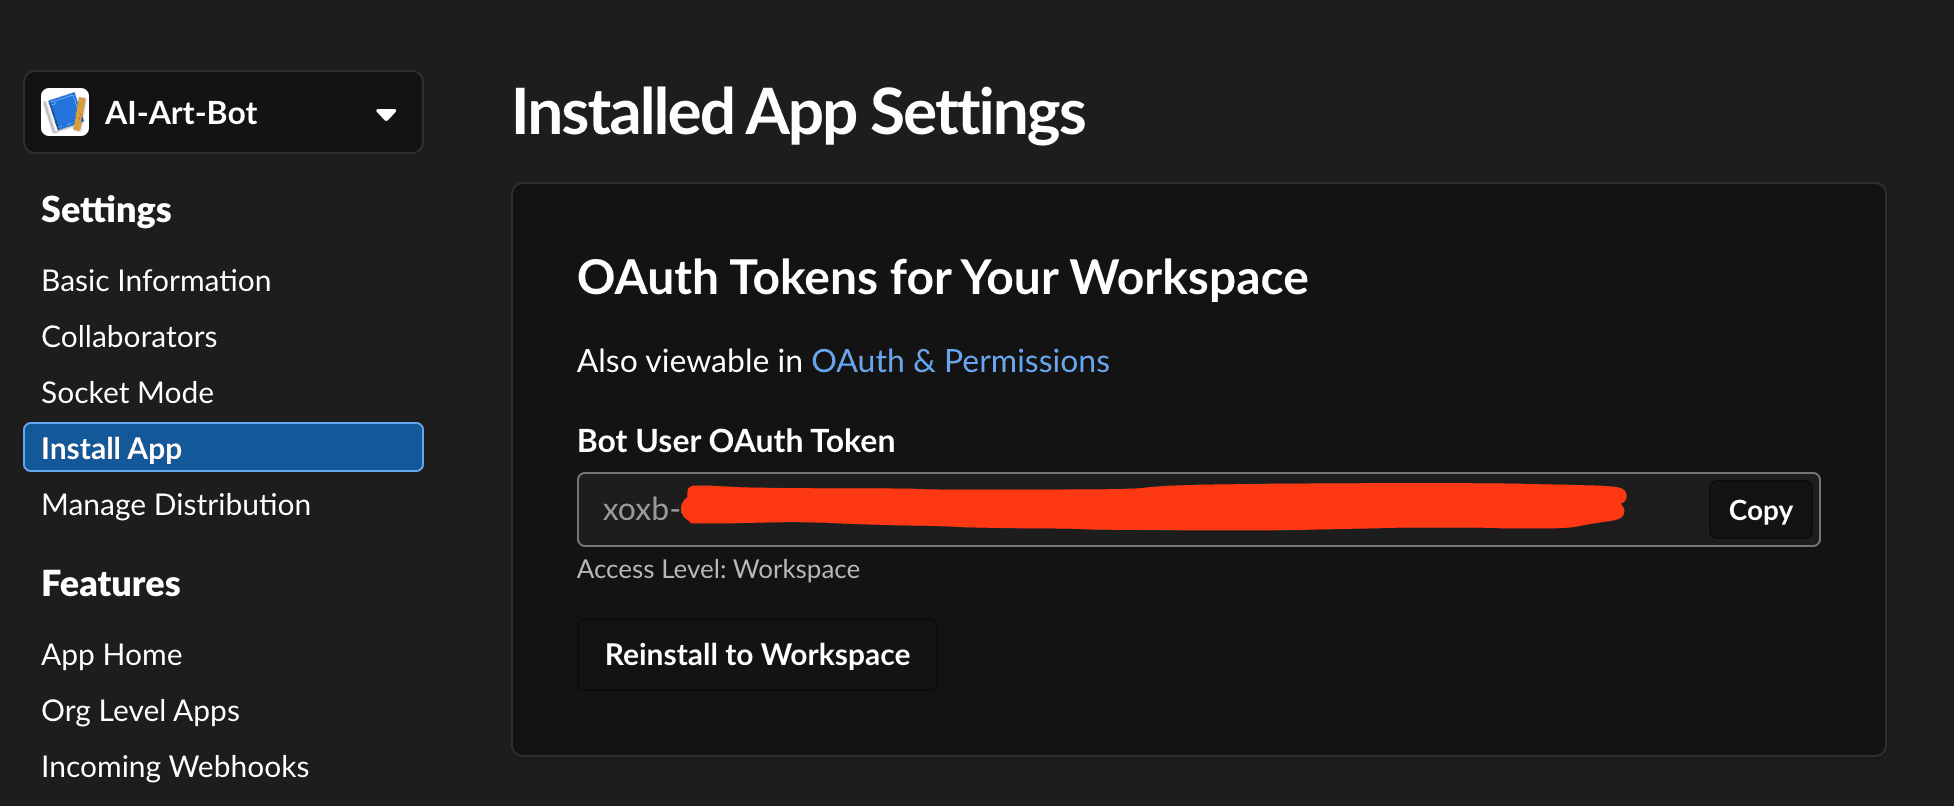
Run the bot, and test it out in a channel in your workspace
npm run startGo to a channel and type
/art a red apple. You should see the bot reply with a generated image.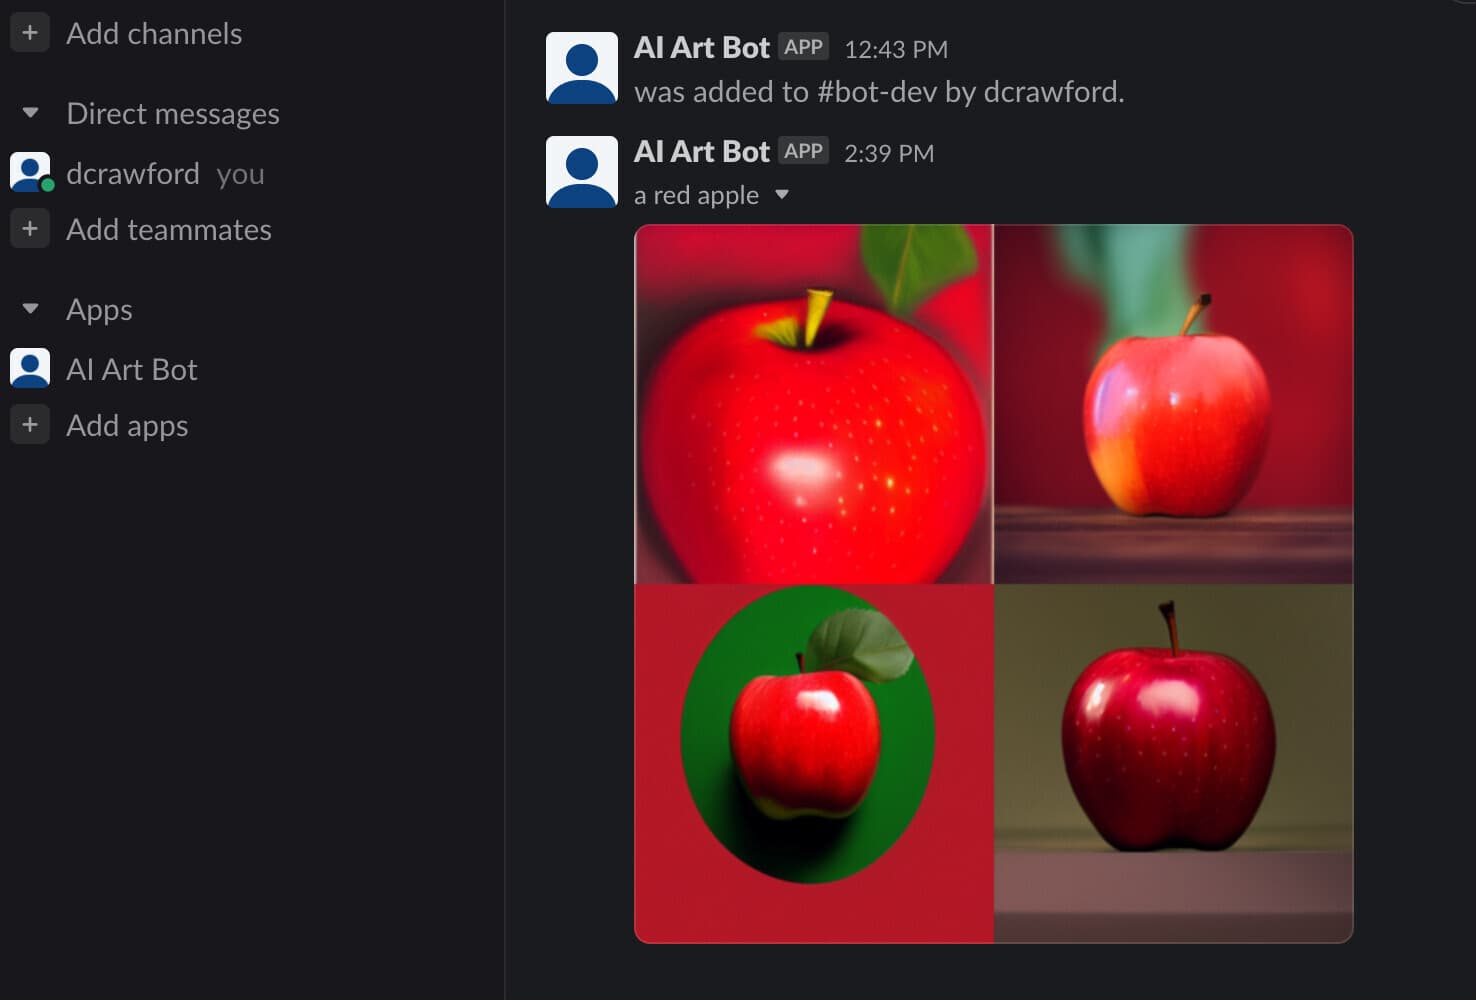
If you try it and you get a
slack bot error: 'not_in_channel'error, add your bot to the specific channel by typing/invite @<BOT_NAME>.
Conclusion #
If you were able to follow along and get your Slack bot to return a photo, congratulations! You’ve just created a simple interface into an AI model!
I hope that you enjoyed walking through this tutorial, and are taking time to look through the Stable Diffusion Web UI docs to discover more ways you can interact with these amazing models!
If you had issues, the beauty of how this works is that we can trace everything back quite easily. There aren’t a lot of moving parts to this.
Troubleshooting #
Check that your Stable Diffusion model is running and accessible on your local network
Try going to <IP_ADDRESS>:7861/docs in your browser. Is this working on your local machine?
If you remove the --nowebui flag, can you go to <IP_ADDRESS>:7861 and see the web UI?
Check that your Slack bot is running properly
Try a basic use-case of just returning some static text. Replace the app.command function with this:
app.command("/art", async ({ body, ack }) => {
    await ack({
    response_type: "in_channel",
    text: "test!",
    });
});
Does your bot reply with test! in the channel?

Looking for more like this?
Sign up for our monthly newsletter to receive helpful articles, case studies, and stories from our team.


Business
Design
Three principles for creating user-friendly products
January 25, 2023Grayson discusses three guiding principles he utilizes when designing user experiences for products.
Read more
Android
Development
iOS
Kotlin Multiplatform
July 14, 2022A brief look at Kotlin Multiplatform Mobile, a newer cross-platform mobile application framework.
Read more