
Step 1 — Use the Ktor project generator #
With the Ktor project generator, you can quickly generate a Ktor project with minimal configuration. You can either generate it via Jetbrains’ website here Generate Ktor Project or use IntelliJ’s built-in project generator. For the sake of this tutorial I used the web generator.
Once you’re on the settings setup page, feel free to configure it how you’d like or set it up with the defaults. I used this configuration:
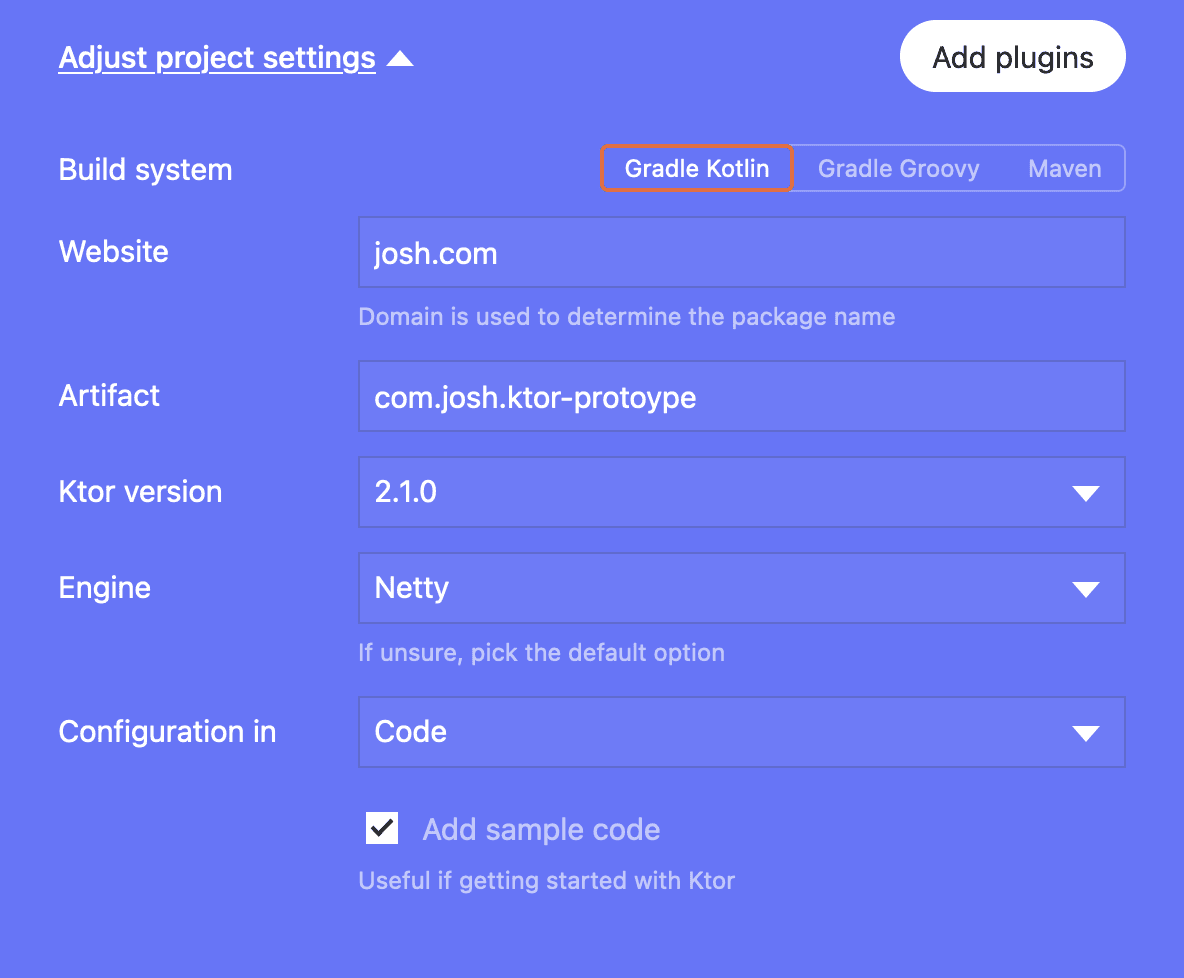
Next, add your plugins, and for a bare bones REST API, I like to choose:
- Routing — For providing named routes with HTTP methods
- ContentNegotiation & kotlinx.serialization — For serializing/deserializing JSON content accepted and returned via our routes.
- Call Logging — A nice to have to add on some additional logging for requests that make it to our server.
You’ll then be able to download the project as a zip file, unzip it and open the project in your IDE (IntelliJ was used for this tutorial, as it handles the gradle syncing and building for us) and we’ll move onto the next step.
Step 2 — Setting up your routes #
You’ll notice that the project has a Application.kt file that sets up the server and configures plugins that may act as interceptors or provide additional functionality like routing. There is also the plugins folder which contains the Monitoring.kt plugin for Call Logging, Routing.kt for our endpoints, and Serialization.kt that tells the server how to understand JSON serialization/deserialization. Each plugin typically gets installed via Ktor’s DSL (Domain Specific Language) using the install() function. The exception here is that routing is setup within the context of Application by calling routing {}.
The Routing.kt plugin starts out with these contents:
fun Application.configureRouting() {

    routing {
        get("/") {
            call.respondText("Hello World!")
        }
    }
}
Where it defines a single endpoint accessed via a GET request to the base route / and responds with the text Hello World!.
You can run the server by right-click on the Application.kt file and clicking Run 'Application.kt'.
What we’ll do next is modify this file to add on some additional routes using that same DSL, as well as show how to separate out the routes into separate “modules”.
Below is the updated example:
@Serializable
data class Book(val name: String, val author: String)
val listOfBooks = mutableListOf<Book>()

fun Route.books() {
    route("/books") {
        get {
            call.respond(listOfBooks)
        }
        get("{name?}") {
            val name = call.parameters["name"] ?: return@get call.respondText(
                "Missing book name",
                status = HttpStatusCode.BadRequest
            )
            val filteredBooksByName = listOfBooks.filter { it.name == name }
            call.respond(filteredBooksByName)
        }
        post {
            val newBook = call.receive<Book>()
            listOfBooks.add(newBook)
            call.respond(HttpStatusCode.Created, newBook)
        }
        delete("{name?}") {
            val name = call.parameters["name"] ?: return@delete call.respondText(
                "Missing book name",
                status = HttpStatusCode.BadRequest
            )
            // If any books were deleted
            when (listOfBooks.removeIf { it.name.equals(name, ignoreCase = true) }) {
                true -> call.respond(HttpStatusCode.Accepted)
                false -> call.respond(HttpStatusCode.NotFound)
            }
        }
    }
}

fun Route.authors() {
    route("/authors") {
        get {
            call.respond(listOfBooks.map{ it.author }.distinct())
        }
    }
}

fun Application.configureRouting() {
    routing {
        books()
        authors()
    }
}
In the above example, we created a basic data class that was marked with kotlinx.serialization’s @Serializable annotation to make it serializable, and the ContentNegotiation plugin we installed will tell the server that whenever we send or receive an object of this type, to convert it to/from JSON back into this class.
We then just keep a list of Books within memory to act as our “database” for now and create two modules, one for the /books endpoint with fun Route.books() {} and another for the /authors endpoint with fun Route.authors() {} and run these two functions within the configureRouting block with a routing wrapper, which comes from the Routing plugin we installed. This gets ran within our Application.kt to tell the server what routes we want to expose.
The meat of the routing file involves the DSL functions:
route() {}— Defines a prefixing path to be used by our child routes called inside our function.get() {}— Defines a GET endpoint that can optionally take parameters with the syntax"{name?}"wherenameis the exposed variable of the path parameter. You should callcall.respond()and pass in an optional status code and object, whose type is inferred, to respond to the client.post() {}— When receiving a POST body, you can callcall.receiveand define the type you’d like to parse from the client. Make sure to still callcall.respond()to let the client know that you received their request.delete() {}— Behaves similarly to the functions above, but will handle DELETE methods.
Summarizing the above, this is a great way to get a quick HTTP API up and running and Ktor supports even more functionality on top of this like: Type-safe routing, authentication, WebSockets, and more. Feel free to check out the documentation for Ktor.
Useful plugins to consider adding in later #
The below plugins weren’t used for this tutorial, but if I were to continue prototyping the project, these are the plugins I’d opt for by default:
- CachingHeaders
- Authentication
- CORS
- Sessions

Looking for more like this?
Sign up for our monthly newsletter to receive helpful articles, case studies, and stories from our team.

Business
Development
Web app vs. mobile app: How to decide which is best for your business
March 26, 2024When considering whether to develop a web app or a mobile app for your business, there’s honestly no definitive answer. But this article will help you make an informed decision that aligns with your business goals and sets you up for success.
Read more
Team
How to Bring Order to the Chaos of Job Applications
August 8, 2023We discuss some tips & tricks for the job application process
Read more
Business
Process
To RFP or not to RFP?
January 19, 2024Selecting the right digital product partner is not just about ticking boxes in a request for proposal (RFP). It’s more important to engage in a meaningful discovery process to find a collaborator who can turn your vision into a successful digital reality. Here are three things to watch out for as you search for the perfect digital collaborator.
Read more