iOS Localization for Dummies
February 25, 2016iOS Localization for Dummies
Localization. What is it? Simply put it’s translating all the human readable text in your app into one or more languages. Many apps developed in the U.S. may not consider it a requirement, but a small amount of extra effort will set you up for success in the future if/when your app needs to be translated. Here is a primer on the setup and tasks involved in creating an iOS app that can be localized.
Project Setup
Older Xcode projects are not configured for localization automatically, so there’s a few steps to configure your project to make sure it supports multiple languages.
- Select the project in the Project navigator and then select the project’s settings (the project name above the target or targets).
- Click on the Info tab, find the Localizations section, and make sure “Use Base Internationalization” is enabled.
- Click the + button to add a new language and select one from the list. Another screen will pop-up and ask about localizing existing Storyboards and/or Interface Builder XIBs.
- Now add a new
.stringsfile to hold translated strings in your Obj-C/Swift code. Go to File -> New -> File (or type cmd-N). You’ll find “Strings File” under the Resources section. - The filename MUST be “Localizable”.
- Select the newly created
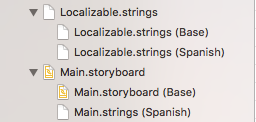
Localizable.stringsfile in the Project. navigator and open the File inspector (on the right in Utilities pane). Click the Localize button, choose the Base localization, then also click the checkbox for your new language in the File inspector.
Now you’ll see multiple versions of Localizable.strings and Storyboard/XIB .strings files, looking something like this:
Translating Text in the User Interface
Any text that will be shown in the User Interface needs to be created using NSLocalizedString() or one of its variants. The second argument is a comment which can be helpful for translation companies to give context to how the string is used within the app. It is optional (can be nil or empty string).
NSString *hello = NSLocalizedString(@"Greetings", nil);
// Strings with a variable can also be localized
NSString *msg =
 [NSLocalizedStringWithFormat:NSLocalizedString(@"There is %d oranges in the box",
 @"There is {number} oranges in the box), orangeCount];
let hello = NSLocalizedString("Greetings", comment: "")
let msg =
String.localizedStringWithFormat(NSLocalizedString("There is %d oranges in the box",
comment: "There is {number} oranges in the box),
orangeCount)A recommended best practice is to use descriptive keys in the NSLocalizedString() macros and match them to the actual user-facing text in .strings file. This is very similar to how Android works with its strings.xml file and you could actually share the same keys if you’re working on a class-platform project. At runtime, the actual translated string is inserted into the UI from the appropriate .strings file.
// your code
let msg = LocalizedString("intro-greeting-message", comment: "An informal greeting")

// Localizable.strings (Base) file
/* An informal greeting */
"intro-greeting-message" = "Hello welcome to the app";

// Localizable.strings (Spanish) file
/* An informal greeting */
"intro-greeting-message" = "Hola bienvenida a la aplicación";
When writing new code, or especially if going through existing code, do not forget about alerts, warnings, buttons, or error messages that show up in UIAlertController Alerts or ActionSheets. There are many more advanced features of UIKit and the Cocoa frameworks, such as pluralizing words using .stringsdict files with String.localizedStringWithFormat and NSNumberFormatter, but I won’t be talking about them here. You can also localize Image files, but not Asset Catalogs directly. Apple has many more details in the Internationalization and Localization Guide.
If your app uses Notifications, Core Location, or other services that require a user’s permission, then you are required to add Info.plist keys explaining to the user why you are requesting those permissions. You can localize Info.plist with the File inspector as described above and add language-specific versions of each required key. These are also facilitated by Xcode’s XLIFF export & import function, which I describe next.
NOTE: One gotcha. As you create new Interface Builder files (Storyboards or XIBs) they need to have Localization enabled and the desired languges checked each time you create one. This is done in the File inspector, as described above.
Sending to the Translator
You do not have to be constantly getting translations for your non-native development language as you build your app. When you get to a good point and are ready to have a translator go through the app, Xcode makes it easy to prepare one file that will contain all the needed strings. Apple chose the XLIFF format since it is cross-platform and has been in use by professional translating services for a while. Android does not directly support XLIFF but there are tools that generate strings.xml files from it. There are also some (relatively) inexpensive apps available if you need to do the data entry yourself.
There is a GUI command for creating (Exporting) the XLIFF file but we recommend using the command line because you will get feedback about any errors that happen during export. At your shell prompt:
$ cd /path/to/project_root
$ xcodebuild -exportLocalizations -localizationPath /path/to/exported_file -project \
ProjName.xcodeproj -exportLanguage es
This will make an es.xliff file which can be updated with the translated strings and then imported through the Xcode GUI by selecting the project file in Project navigator and choosing Editor -> Import Localizations… When you Import the XLIFF file, Xcode has a handy sheet that highlights potential problems such as missing translations. Some warnings could be superfluous, however (such as the same string in both languages, e.g. No (en) == No (es)).
Some Helpful Tips
We ran into a couple issues using the xcodebuild -exportLocalizations command.
- NSAttributedStrings created in a Storyboard or XIB file appear to be ignored. We have often had to create them in code and then add the string to the Interface Builder file.
- Multi-line string literals (a convenience of the compiler to break really long strings across multiple lines) are ignored by the Export and will actually generate an error when you use the
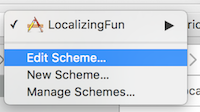
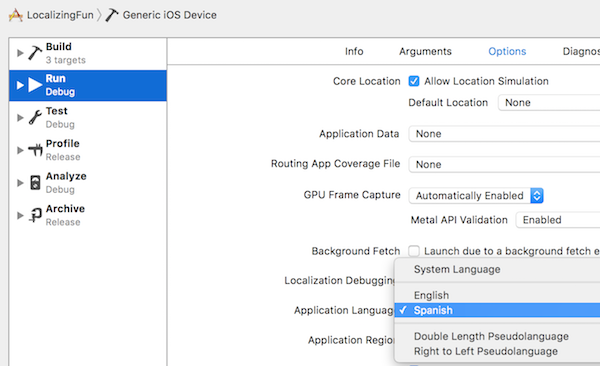
xcodebuildcommand line tool. - Create a new Scheme (or temporarily modify an existing Scheme) to test using a different language on the Simulator. Don’t try to just change the Language settings in the Simulator.
- Also in the Scheme settings, you can enable “Double Length Psuedo Language” to test your Layout Constraints and how they handle really long translations.
- For best overall results, use a real device and just change the Language in Settings.
We hope you found this helpful. Happy Localizing!

Looking for more like this?
Sign up for our monthly newsletter to receive helpful articles, case studies, and stories from our team.

Business
Process
Business Model Canvas: Helping business leaders create meaningful digital products
January 17, 2024When it comes to custom software, it’s easy to feel stuck between needing to deliver value quickly, while also ensuring meaningful, long-lasting results. Learn why the Business Model Canvas can help you identify the right digital product for your business needs.
Read more
Business
Design
Process
Product Strategy
November 22, 2022A look at Product Strategy at MichiganLabs. Why we do it, what it is, what it is not, and how we approach it.
Read more
iOS